Running Facebook ads without purchase tracking is like spending money blindfolded. The campaigns might bring in sales, but you have no way to tell which ad, audience, or creative produced them, so every optimization decision becomes a guess.
That guesswork compounds fast. Wrong ads get scaled, profitable ads get paused, and budget drifts toward whatever looks good on the surface.
Accurate purchase tracking fixes this by letting you measure ROAS by campaign and optimize toward real buyers. The setup follows a two-source rule: every conversion should be confirmed by both browser tracking (the Pixel) and server-side tracking (the Conversions API), so iOS privacy changes and ad blockers don’t quietly drain your reporting.
Note: We offer an ad management service to help businesses generate and manage their purchases on Meta. Want to see how it works? Book a free consultation here.
Before you can track anything, you need to know what you’re tracking and where the data will go. That’s where Meta Business Manager comes in. Business Manager is the hub where you manage your ads, Pixels, events, and reports.
- If you don’t have an account yet, go to business.facebook.com,
- Click Create Account
- And follow the prompts to confirm the admin address.
If you already have one, simply confirm that it’s set up correctly and that you have admin access. Without this step, you won’t be able to create or connect your Pixel.
2. Install the Meta Pixel correctly before tracking purchases
Most tracking problems begin with a bad Pixel install. The Pixel either fires twice, fires on the wrong page, or doesn’t fire at all, and every downstream report inherits the error.
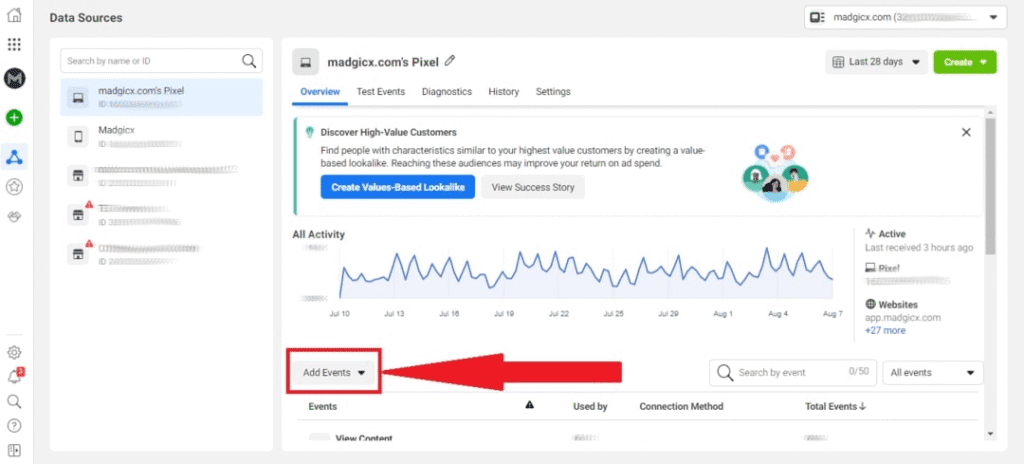
Before installing, confirm you have a Meta Business Manager account with admin access to your ad account and website. In Events Manager, create a new Pixel under “Data Sources” and name it after the website, not the ad account.
The install method depends on your platform.
Shopify. Use Shopify’s native Meta channel integration (Settings → Apps and sales channels → Facebook & Instagram). This installs the Pixel and the Conversions API together, the cleanest setup for e-commerce. Don’t paste Pixel code into the theme manually on top of this; you’ll get duplicate events.
WooCommerce. Install the official “Facebook for WooCommerce” plugin. Connect your Meta Business account, select your Pixel, and enable Advanced Matching. Event mapping for ViewContent, AddToCart, InitiateCheckout, and Purchase is handled automatically.
Google Tag Manager (GTM). Best for custom-built sites. Create a Custom HTML tag with the base Pixel code triggered on All Pages, then add separate tags for each standard event. Verify each one fires in GTM’s preview mode before publishing.
Manual install. Paste the base Pixel code into the <head> of every page, then add event code on the relevant pages. Manual installs break the moment a developer pushes a header update, so we recommend GTM over manual for any site that ships changes monthly.
After installing, verify the base Pixel fires on every page using the Meta Pixel Helper Chrome extension. Green checkmarks mean it works. Red errors mean fix before continuing.
3. Set up the Purchase event properly
The Purchase event is the conversion signal Meta uses to optimize e-commerce campaigns. If it’s missing or misconfigured, the algorithm has nothing to learn from, and your ads optimize for clicks instead of revenue.
Go to Events Manager → your Datasets → Overview → Add Events. Choose “From the Pixel” and select “Purchase.” Use standard events (Purchase, AddToCart, InitiateCheckout) over custom events whenever possible because they’re recognized automatically across Meta’s tools.
Five settings determine whether the event tracks correctly:
- Trigger location. Fire on the thank-you or order-confirmation page, never on the checkout page itself. Firing on checkout counts abandoned attempts as purchases.
- Value parameter. Pass the order value as a number (e.g., 8500), not a string. Without this, ROAS reporting won’t work.
- Currency parameter. Set the ISO code (NGN, USD, GBP). For international stores, match the customer’s actual payment currency.
- Content IDs. Pass the product SKUs. This unlocks dynamic product ads and accurate retargeting.
- Order ID. Pass a unique ID per order. Meta uses this to deduplicate when both the Pixel and CAPI report the same purchase.
Shopify and WooCommerce plugins handle these parameters automatically once connected. Manual and GTM installs need them wired in by hand, which is where most misconfiguration happens.
No thank-you page? Two workarounds. If checkout redirects to a third-party processor (PayPal, Paystack, Flutterwave) and never returns to your domain, set up a webhook from the processor to a server endpoint and fire Purchase through the Conversions API directly. If your sales close offline (lead-to-sale flows), fire the Purchase event from your CRM when a deal is marked closed-won. Both methods skip the browser and report from your server.
Verify purchase events before spending money
Three free tools catch most errors before they cost you ad spend.
- Meta Pixel Helper. Run a test purchase. The extension should show exactly one Purchase event with value, currency, and content IDs. Two events for one transaction means a duplicate firing issue.
- Test Events tool. Inside Events Manager, click “Test Events” and enter your URL. Place a test order. The event should appear in the live feed with all parameters intact. Missing parameters are shown in red.
- Diagnostics tab. Events Manager flags events firing more than once for the same user. Duplicate firing inflates conversions, which is good for vanity reporting and terrible for optimization.
4. Diagnose the most common Facebook purchase tracking problems
Most tracking issues come from duplicated events, missing parameters, or attribution mismatches. The six errors below are the ones we see most often, and how to fix each.
|
Problem |
What it looks like |
How to fix it |
|
Missing value parameter |
Purchases track, but ROAS shows 0 or N/A |
Add order total as a numeric value; confirm currency is set |
|
Double firing |
Conversion count is 2× actual orders |
Disable duplicate install (usually theme tag + plugin); deduplicate Pixel and CAPI with order IDs |
|
Wrong event priority |
iOS users don’t optimize properly |
Configure Aggregated Event Measurement; set Purchase as the highest-priority event |
|
Cookie limitations |
Conversion windows are shrinking over time |
Enable First-Party Cookies in Pixel settings; lean on CAPI for long-window attribution |
|
Ad blockers |
Pixel events under-report vs. store analytics |
Use CAPI; server-side events bypass ad blockers |
|
Domain verification |
“Domain not verified” warning in Events Manager |
Verify domain via DNS TXT record or HTML file upload |
Three of these catch even experienced advertisers.
Aggregated Event Measurement (AEM). Since iOS 14, Meta optimizes for up to 8 events per domain, and only the highest-priority event counts for iOS users. If AddToCart is prioritized above Purchase, iOS purchases get reported as AddToCart, and your campaign won’t optimize for sales. Always set Purchase as priority #1.
Domain verification. Without verifying your domain in Business Settings → Brand Safety → Domains, iOS users effectively don’t exist in your attribution. Verify on the same Business Manager that owns the Pixel, not a personal account.
Data mismatch with store analytics. Meta’s reported conversions will differ from Shopify or WooCommerce by 5 to 15 percent. This is expected, not an error. Attribution model (Meta uses 7-day click + 1-day view; Shopify uses last-click), timezone, and modeled conversions all contribute. Pick one source of truth for decisions and stop reconciling daily.
5. Track the metrics that actually matter after setup
Tracking purchases matters only if you use the data correctly. Five metrics carry the most weight:
- ROAS (Return on Ad Spend). Revenue ÷ ad spend. Most ecommerce brands need a blended ROAS of 2.5 to 4 to cover product cost, shipping, and overhead. Lower-margin categories (fashion, FMCG) need higher ROAS than higher-margin ones (jewelry, beauty).
- CPA (Cost per Acquisition). Ad spend ÷ purchases. The simplest sanity check. If CPA exceeds your gross margin per order, you’re losing money even when other metrics look fine.
- MER (Marketing Efficiency Ratio). Total store revenue ÷ total ad spend across all channels. MER captures the full-funnel effect platform ROAS misses, including organic lift from paid spend. Use MER for board-level reporting and ROAS for campaign-level decisions.
- AOV (Average Order Value). Revenue ÷ orders. The lever bundles, free shipping thresholds, and upsells move. Raising AOV by 20 percent often does more for profitability than raising conversion rate by 20 percent.
- Attribution windows. Default is 7-day click + 1-day view. For higher-consideration purchases (over $200), expand to a 28-day click. For impulse buys, the default is fine.
Track ROAS and CPA daily at the campaign level, MER weekly at the account level, and AOV monthly. If you’re managing multiple campaigns, our Facebook ad management team handles the daily monitoring.
Final thoughts
Accurate Facebook purchase tracking comes down to four things: a clean Pixel install, a properly configured Purchase event, server-side coverage via CAPI, and clarity on which metrics drive decisions. Get those four right and your campaigns optimize toward real revenue instead of vanity conversions.
The brands that scale Facebook ads profitably treat tracking as infrastructure, not a checkbox. Fix it once, audit it quarterly, and stop wondering whether your dashboard reflects reality.
Need help setting up reliable Meta conversion tracking for your store? Talk to Socialander. We’ll audit your current setup, fix what’s broken, and connect your campaigns to a tracking stack that holds up under iOS, ad blockers, and platform changes.