Running ads without tracking purchases is like sailing without a compass. You might reach some destination, but you won’t know if it’s the right one or whether the journey was worth it. Tracking purchases on Facebook Ads helps you see which ads actually drive sales, how much revenue they generate, and where your budget may be wasted. It also gives insights into buyer behaviour like what products people prefer, when they’re most likely to purchase, and which ad creatives convert best. It’s the difference between guessing and making informed decisions.
In this article, you’ll learn step by step on how to set up purchase tracking in Facebook Ads, so you can optimize your campaigns with confidence.
At Socialander, we help businesses set up, track, and manage campaigns so every penny brings profit. Our team ensures you’re not flying blind.
#1. Set Up a Meta Business Manager Account
Before you can track anything, you need to know what you’re tracking and where the data will go. That’s where Meta Business Manager comes in. Business Manager is the hub where you manage your ads, Pixels, events, and reports.
- If you don’t have an account yet, go to business.facebook.com
- click Create Account
- and follow the prompts to confirm the admin address.
If you already have one, simply confirm that it’s set up correctly and that you have admin access. Without this step, you won’t be able to create or connect your Pixel.
#2 Install the Meta Pixel on Your Website
The Meta Pixel is a small piece of code that tracks what people do on your website after clicking your ad. It’s the main tool for monitoring purchases and other conversions.
To set it up,
- Open Events Manager inside Business Manager
- Create a new Pixel and name it
- Connect the Pixel to your website
- Add the Pixel code to your site header or use integrations with Shopify, WordPress, or Wix
Once this is done, your Pixel starts sending data back to Facebook whenever users interact with your site.
#3. Enable the Standard Purchase Event
Installing the Pixel is just the foundation, you also need to tell it what to track. For purchase tracking, this means enabling the Purchase event.
Here’s how:
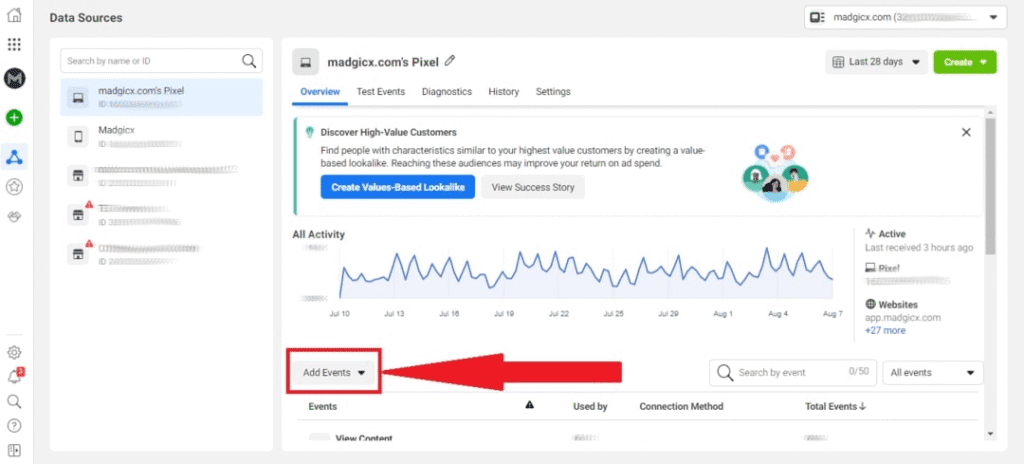
- In Events Manager, go to your Pixel and select Add Events
- Choose Purchase as the event type
- Place the event code on your checkout confirmation or thank-you page
You can set this up automatically (Meta will detect purchase pages) or manually by adding event code to your checkout confirmation or thank-you page. This ensures that whenever a customer completes an order, the Pixel reports it back as a purchase.
If you sell different products or want to track specific values, you can customize the purchase event to record order amounts. This helps you see not just how many sales you made, but how much revenue each ad generated.
#4. Verify Pixel Installation
Once your Pixel and purchase event are set up, it’s important to confirm they’re working properly. If your Pixel isn’t firing, none of the purchase data will be tracked.
The easiest way to do this is with the Meta Pixel Helper, a free Chrome extension. After installing it, visit your website and check if the Pixel is detected. You should see a green checkmark showing that it’s active.
You can also run a test event inside Events Manager:
- Go to Test Events in Events Manager
- Make a test purchase or visit your checkout page
- See if the Purchase event is triggered in real time
This gives you peace of mind that your setup is working before you start running ads at scale.
#5. Use the Conversions API (CAPI)
The Pixel alone tracks most purchases, but since Apple’s iOS 14 privacy update, some data gets lost due to browser restrictions. That’s where the Conversions API (CAPI) comes in.
CAPI works by sending purchase data directly from your server to Meta, rather than relying only on browser tracking. This makes your reporting more accurate and reliable, especially if your audience uses iOS devices.
You can set up CAPI in two main ways:
Partner integration: Platforms like Shopify, WooCommerce, and WordPress have direct CAPI integrations you can turn on with a few clicks.
Manual setup: This requires a developer to connect your server to Meta, which is more technical but gives full control.
While optional, using CAPI alongside your Pixel ensures that you’re not missing valuable purchase data.
#6. Set Up Custom Conversions (If Needed)
In most cases, the standard Purchase event is enough. But if your business has a unique checkout flow or you want to measure very specific actions, you can use Custom Conversions.
For example, let’s say your thank-you page URL contains “order-confirmation.” You can tell Meta to count every visit to that URL as a purchase.
To create one:
- Go to Events Manager
- Select Custom Conversions
- Define the rule (e.g., “URL contains order-confirmation”)
- Assign it as a purchase conversion
This helps when your setup doesn’t allow adding event code directly or if you want to track purchases from a specific funnel.
#7. Track Purchases Inside Ads Manager
After setup, the final step is checking results inside Ads Manager. This is where you’ll see how many purchases your campaigns generate, how much revenue they bring in, and whether your ad spend is profitable.
To view this:
- Go to Ads Manager
- Click on Columns at the top right
- Select Performance and Conversions (or customize columns to include Purchases, ROAS, and Cost per Purchase)
From here, you can compare which ads, audiences, or campaigns deliver the best return. This insight helps you double down on what works and cut what doesn’t.
Common Issues and Fixes
Even after setting everything up, you may run into problems. Here are some of the most common ones and how to fix them:
#1. Pixel not firing: If your Pixel isn’t showing up, double-check that the code is correctly installed in your site header. You can also test it with the Meta Pixel Helper extension.
#2. Purchases not tracking: This usually means the Purchase event isn’t placed correctly. Make sure it’s added to your checkout confirmation or thank-you page. If you’re using integrations like Shopify or WooCommerce, confirm that the event is turned on in your settings.
#3. Data mismatch: Sometimes the numbers you see in Ads Manager don’t match your store analytics. This is common because of browser restrictions or ad blockers. Using the Conversions API (CAPI) alongside the Pixel helps close this gap and gives you more accurate reporting.
FAQs
#1. Do I need both Pixel and CAPI?
No, but it’s recommended. Pixel alone can work, but combining it with CAPI ensures more complete tracking—especially after iOS privacy changes.
#2. Can I track purchases on mobile apps?
Yes. If you have a mobile app, you’ll need to use the Meta SDK or connect via CAPI to track in-app purchases.
#3. What if I use Shopify or WooCommerce?
Good news: both Shopify and WooCommerce have direct integrations with Meta. This means you can set up Pixel and CAPI without touching any code; just connect your store through the integration and turn on purchase tracking.
Conclusion
Tracking purchases on Facebook Ads is the foundation of running profitable campaigns. Without it, you’re guessing; with it, you gain data-backed clarity on which ads bring results, what your customers respond to, and how to allocate your budget for maximum return.
By setting up the Pixel, enabling purchase events, and using tools like CAPI, you move from “hoping your ads work” to knowing exactly how they perform. The real power lies in using this data to refine, scale, and grow your business sustainably.
If you want expert hands to handle setup, management, and optimization, Socialander is built to do just that, helping you turn ad spend into measurable growth.